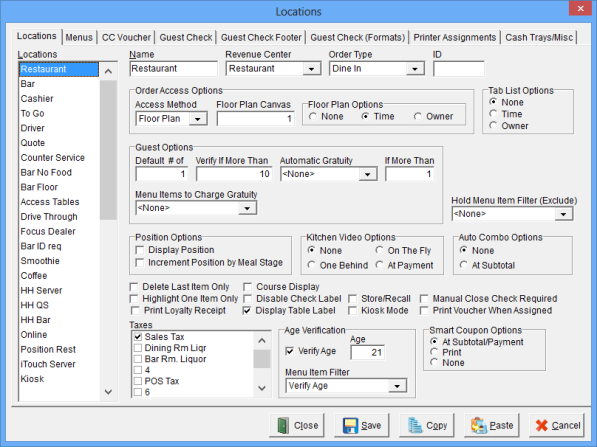
The Locations Window is used to establish the basic attributes such as the Name, Revenue Center, Order Type and applicable Taxes for up to 50 Locations.
Accessing the Locations Window
While in Focus Setup, select Locations > Locations.
Figure 7.4 Locations Window
Figure 7.5 Locations Window Fields
| Field |
Description |
||||||||||||||||||||||||||
| Name | A unique name for each Location, up to 15 alphanumeric characters. | ||||||||||||||||||||||||||
| Revenue Center | The selected Revenue Center will be assigned to all checks created for this Location. | ||||||||||||||||||||||||||
| Order Type | The default Order Type for the Location. | ||||||||||||||||||||||||||
| ID | A unique identifier for the Location, up to 10 alphanumeric characters. Note: You do not have to enter an ID for each location. | ||||||||||||||||||||||||||
| Order Access Options |
|
||||||||||||||||||||||||||
| Tab List Options |
|
||||||||||||||||||||||||||
| Guest Options |
|
||||||||||||||||||||||||||
| Hold Menu Items Filter (Exclude) | Menu Items from the selected filter cannot be placed on hold. | ||||||||||||||||||||||||||
| Position Options |
|
||||||||||||||||||||||||||
| Kitchen Video Options |
|
||||||||||||||||||||||||||
| Auto Combo Options |
|
||||||||||||||||||||||||||
| Delete Last Item Only | The user may only delete the last item ordered. | ||||||||||||||||||||||||||
| Highlight One Item Only | Allows the user to select only one item on the on-screen check. | ||||||||||||||||||||||||||
| Print Loyalty Receipt | The Loyalty Receipt will print for Loyalty Customers. | ||||||||||||||||||||||||||
| Course Display | Displays the Course Number on the On-Screen Check. See Video: Courses. | ||||||||||||||||||||||||||
| Disable Check Label | Prevents the Check List Screen from displaying when the Check Label is touched. | ||||||||||||||||||||||||||
| Display Table Label | Displays the word “Table” on the On-Screen Check. | ||||||||||||||||||||||||||
| Store/Recall | Used with 'QSR' Automation. Recalls orders previously sent to the kitchen in 'Quick Service'. | ||||||||||||||||||||||||||
| Kiosk Mode |
When selected the Command and Menu Ribbon will not display. (V7.4 Build 13.5.14) |
||||||||||||||||||||||||||
| Manual Close Check Required | Requires the user to close a check manually. | ||||||||||||||||||||||||||
| Print Voucher When Assigned |
When selected the Credit Card Voucher will print when the order is assigned to an employee via the Dispatch screen. (V7.4 Build 13.7.2) |
||||||||||||||||||||||||||
| Taxes | The Taxes that apply to items ordered at this Location. For a Tax to be applied to a check, the following Tax Options must be set: Order Entry > Taxes > Order Types, Locations > Locations > Taxes and Menu > Menu Items > Taxes. Note: All 3 of these options must be set before the Tax will be applied to the check. | ||||||||||||||||||||||||||
| Age Verification |
|
||||||||||||||||||||||||||
| Smart Coupon Options |
|
Figure 7.6 Locations Window Commands
| Field |
Description |
| Close | Closes the Locations Window. |
| Save | Saves current settings. |
| Copy | Copies the settings of the selected Location to the clipboard. |
| Paste | Pastes the settings of the previously copied Location. |
| Cancel | Cancels changes without saving. |
Procedure to Establish Locations
See also (Locations > Locations > Menus)
See also (Locations > Locations > CC Voucher)
See also (Locations > Locations > Guest Check)
See also (Locations > Locations > Guest Check (Formats))
See also (Locations > Locations > Printer Assignments
See also (Locations > Locations > Screen Layout)
See also (Locations > Locations > Cash Trays)
Job Right ‘Office - Locations’