 Screen Formats Screen Formats
|
|
Purpose
The Screen Formats Window is used to
establish specific display formats that are used throughout Focus Enterprise.
For example, a text style, font, font size, and color may be set up. Up to 100
Screen Formats may be established.
Accessing the Screen Formats Window
While in Focus Enterprise, select
Setup > Screen Formats.
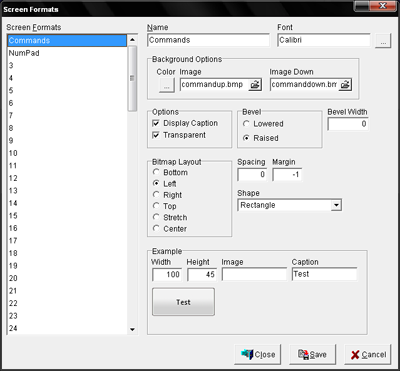
Figure 4.8 Screen Formats Window
Figure 4.8.1 Screen
Formats Window Fields
|
Field |
Description |
||||||||||||
|
Name |
A unique name for each Screen Format,
up to 25 alphanumeric characters. |
||||||||||||
|
Font |
Select the Font and size from the
list of available Fonts. Note:
Fonts are only used for Screen Formats and not for printing. |
||||||||||||
|
Background Options |
|
||||||||||||
|
Options |
|
||||||||||||
|
Bevel |
|
||||||||||||
|
Bevel Width |
Enter a number, in pixels, to
establish the width of the bevel. |
||||||||||||
|
Bitmap Layout |
|
||||||||||||
|
Spacing |
Indicates the number of pixels
between the margin and the caption. |
||||||||||||
|
Margin |
Enter a number to indicate the number
of pixels between the bevel and the caption or graphic. If the margin is set
to -1, the caption is centered. |
||||||||||||
|
Shape |
Select the shape of the button.
Ellipse, Rectangle, and Rounded Rectangle are the available options. |
||||||||||||
|
Example |
|
Figure 4.8.2 Screen
Formats Window Commands
|
Command |
Description |
|
Close |
Closes the Screen Formats Window. |
|
Save |
Saves current changes. |
|
Cancel |
Cancels changes made prior to saving. |
Procedure to Establish Screen
Formats
▪ Enter the name of each Screen Format in the separate Name
text box.
▪ Choose the desired font, font style, font size, and color.
▪ Choose a Background Color.
▪ Select the image to be displayed.
▪ Select the image down that will be used if the format is
used for a depressed button.
▪ Select one of the available options: Display Caption, or
Transparent.
▪ Select a bevel option: Lowered, or Raised; then enter the
desired bevel width in pixels in the Bevel width text box.
▪ Select a layout option for the graphic image: Bottom, Left,
Right, Top Stretch or center; then enter the desired spacing, in pixels, in the
Spacing text box.
▪ Enter the desired margin size, in pixels, in the Margin
text box.
▪ Select the shape that will be used if the format is to be
used for a button.
▪ Select the width, height, image, and text that the sample
will use.
▪ Click Save.